Replacing traditional paper charts, the Enroute Charts View is your primary visual flight planning tool. You can view any location within your coverage area. Unlike paper charts, FliteStar enables you to customize enroute charts, as well as display and print only the locations, zoom levels, and chart objects you want. With FliteStar, you can pan, zoom in and out, revisit previous views, and center the enroute chart on a selected object, as well as show or hide a variety of chart objects and features.
| NOTE | The Enroute Charts View is for reference only, and not meant to be a replacement for paper charts. Due to decluttering constraints, some data elements (such as segment distances) may not be available. |
You can use the following options to zoom in and out on the enroute chart:
Drag zoom
Right-click options
Chart toolbar buttons
Keyboard options
Mouse wheel
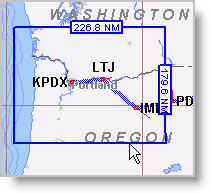
FliteStar has continuous zoom capability. Point to the upper left corner of an area you wish to zoom in, press the left mouse button and, while holding the mouse button, drag down and to the right to draw a box. The scale of the box is displayed along the blue edges. When you let go of the mouse button, the area inside the box will resize to fill the screen. The smaller the box you draw on the screen, the closer you will zoom in on the chart.

You can zoom in or out one level by right-clicking in the Enroute Charts view and selecting Zoom In or Zoom Out from the shortcut menu. You can return to the overall view (fully zoomed out) by selecting Full Zoom Out.
It is sometimes advantageous to use the Full Zoom Out option and complete a drag zoom to change the area you are viewing.
Click the Zoom In ![]() and
Zoom Out
and
Zoom Out ![]() buttons
on the Chart toolbar.
buttons
on the Chart toolbar.
The PLUS (+) and MINUS (-) keys on the keyboard are another very fast method of zooming in and out on a chart. Press and release the keys to zoom by steps.
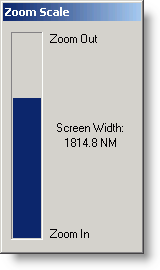
Hold either key down to see the zoom scale bar graph. The bar will be moving to a larger or smaller screen width, depending on which way you are zooming. Release the key to zoom to a particular scale.

If you have a mouse wheel, you can use it to zoom in and out. To enable the mouse zooming feature:
Click Tools > Options.
On the Display tab, select the Mouse wheel zoom check box.
After the mouse wheel zoom is enabled:
Push the mouse wheel forward to zoom in.
Pull the mouse wheel back to zoom out.
You can use the following options to scroll the enroute chart:
Keyboard options
Mouse button
Mouse wheel
Use the arrow keys on the keyboard to scroll up, down, left and right.
Point to the edge (or corner) of the main window, so that the mouse pointer becomes an arrow. Click to move in that direction.

If you have a mouse wheel, you can use it to scroll up and down. To enable the mouse scrolling feature:
Click Tools > Options.
On the Display tab, clear the Mouse wheel zoom check box.
FliteStar enables you to center the Enroute Charts View on a selected point, waypoint, or route.
Double-click an open area of the chart on which you want to center.
Click Chart > Center on Cursor and then click the chart where you would like it to be centered.
Right-click a waypoint on the enroute chart, the Airport List (JeppView feature), or the RoutePack List.
Choose Center On.
Select a RoutePack or route on the enroute chart or in the RoutePack List, and then click Chart > Show RoutePack or Show Route, or press CTRL+R.
In the RoutePack List, right-click on a RoutePack or route, and then choose Show RoutePack or Show Route.
Double-click the airport in the Airport List (JeppView feature) or the RoutePack List.
Right-click an airport on the enroute chart, the Airport List, or the RoutePack List and choose Center On.
The Previous View and Next View features, available for the Enroute Charts and Terminal Charts views, enable you to navigate through previously viewed locations and zoom levels — similar to the Back and Next buttons in a web browser. If you zoom in too close on an unfamiliar area, you can use the Previous View feature to return to your previous location and zoom level. To see the Previous or Next View, do one of the following:
Right-click an open area on the enroute chart and choose Previous View or Next View.
Click the Previous View or Next View buttons on the Chart toolbar.
Press ALT+LEFT ARROW for the Previous View.
Press ALT+RIGHT ARROW for the Next View.
| NOTE | Next View becomes available only after Previous View has been selected. |