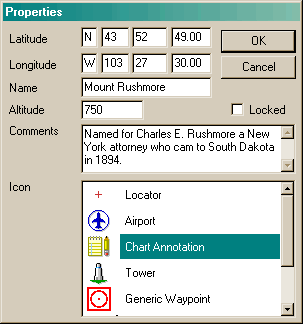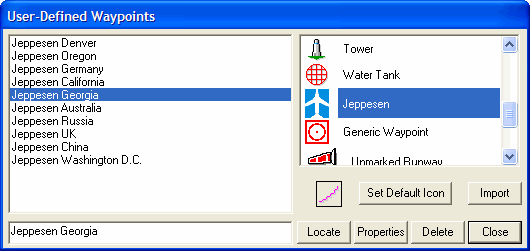
User-defined waypoints enable you to mark a location of interest on the Enroute Charts View or a customized waypoint in a route. User-defined waypoints can be customized with the following properties, which can be modified:
Icon
Name
Latitude and longitude
Comments
Altitude
Locked or unlocked
To set a user-defined waypoint:
Perform one of the following actions to activate the user-defined waypoint drop function:
Click Tools > Drop User-Defined Waypoint.
Press CTRL+M.
The mouse pointer changes to a waypoint symbol.
Click on the chart at the desired location. FliteStar displays the Waypoint Properties dialog box.

Type the Name of the waypoint as you want it to appear in the Enroute Chart View. The first five characters of the name are used in the enroute chart and reports.
Add Comments for the waypoint (optional).
You can modify the Latitude and Longitude to change the location of the waypoint.
Select the Lock check box if you want to keep the waypoint from being accidentally moved to a new location.
You can also enter an Altitude in feet for this location.
Selecting a different icon from the list modifies the icon displayed in the Enroute Charts View for this waypoint.
Click OK.
FliteStar displays the new waypoint on the Enroute Charts View.
The default icon setting automatically assigns an icon to every new user-defined waypoint.
To change the default icon, do either of the following:
Click Tools > Set Default User-Defined Waypoint, select the desired icon, and then click OK.
Click Edit > User-Defined Waypoints, select the icon on the right, and then click Set Default Icon. Click OK, and then click Close.

To delete a user-defined waypoint, do any of the following:
Click the waypoint in the Enroute Charts View and then press DELETE.
Right-click the waypoint in the Enroute Charts View and choose Delete.
Click Edit > User-Defined Waypoint, select the waypoint, and then click Delete.
To modify a user-defined waypoint:
Open the waypoint Properties dialog box by doing either of the following:
Right-click the waypoint on the Enroute Charts View or RoutePack List and click Properties.
Click Edit > User-Defined Waypoints, select the desired waypoint in the User-Defined Waypoint dialog box, and click Properties.
Change the waypoint properties as desired and click OK.
In the User-Defined Waypoints dialog box, the Import button allows you to import any user-defined waypoints from FliteStar version 7.x only. FliteStar version 7.x used a different format than what is used currently. The import feature can also be accessed by clicking File > Import > 7.x User-defined Waypoints and following the on-screen directions.
Other user-defined waypoints can be imported into FliteStar by utilizing a spreadsheet that helps with the conversion process and placing the converted text into the Markers.ini file. The file is located in one of the following default locations based upon your setup and operating system:
C:\Users\User Profile]\Jeppesen\FliteStar (Windows Vista and Windows 7)
C:\Program Files\Jeppesen\FliteStar (Windows XP)
C:\Jeppesen\FliteStar (Windows XP)
Please email rgarrison@jeppesen.com for the Microsoft® Office Excel spreadsheet and details.
To show or hide all user-defined waypoints:
Right-click an open area in the Enroute Charts View and choose Properties.
Click the Chart Preferences tab.
Click the plus sign (+) to expand the Nav Data category.
Select or clear the User Waypoints check box.