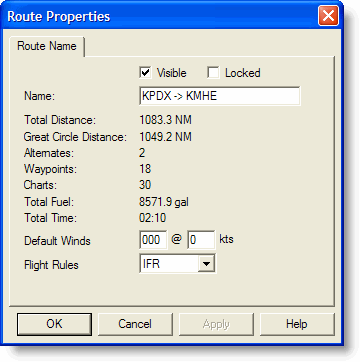
The Route Properties dialog box gives you information about your route, as well as the ability to do the following:
Name the Route
Hide or Display the Route
Lock/Unlock a Route
Change the Default Winds
Select different Flight Rules
There are two ways to view the Route Properties dialog box:
Double-click on a route on the Enroute Charts View.
Right-click on a route on the Enroute Charts View or in the RoutePack List, then choose Properties from the shortcut menu.
FliteStar names new manual routes numerically, "Route 1", "Route 2", etc. Routes created with the RoutePack Wizard are named using the departure and destination points, such as KPDX -> KMHE.
To rename a route:
Right-click a route in the Enroute Charts View or RoutePack List.
Choose Properties from the shortcut menu.
In the Name field of the Route Properties dialog box, enter a new route name.
Click OK to accept your change.
When you’re working with more than one route, or comparing alternative routes between the same points, you may find the route lines in the Chart view interfere with each other, yet you may not want to delete any of them.
To hide a route line in the Enroute Charts View:
Right-click a route in the Enroute Chart View or RoutePack List.
Choose Properties from the shortcut menu.
Clear the Visible check box.
Click OK to accept your change.
The Route is still displayed and fully editable in the RoutePack List, it’s just hidden in the Enroute Charts View. To view the route on the chart again, open Route Properties and select the Visible check box.
After you have spent time setting up a route, you may want to lock the route when you are finished so it is not inadvertently altered later.
Right-click a route in the Chart View or RoutePack List.
Choose Properties from the shortcut menu.
Select the Locked check box to lock the route.
Click OK to accept your change.
Now the route cannot be changed by dragging or clicking in the Chart View. To go back and edit the route, open Route Properties and clear the Locked check box.