Use one of the following methods to access the Climb Data information for your aircraft model:
If you have an advanced aircraft selected as your default aircraft, then click Edit > Default Aircraft > Edit Default and click the Climb Data tab.
If you are creating a new advanced aircraft, click Edit > Default Aircraft. In the Aircraft Library Manager dialog box, click File > Create a New Aircraft Model. The Climb Data dialog box appears after you enter some other basic aircraft information.
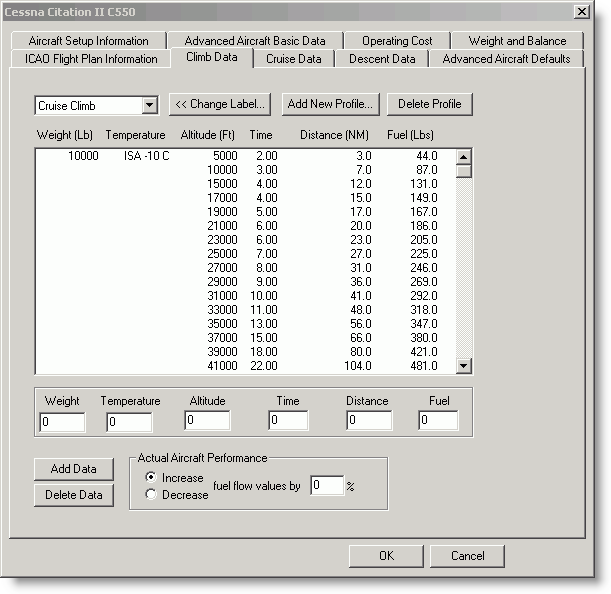
FliteStar uses the standard climb tables used by most aircraft manufacturers. Basically, you enter the time (minutes), distance (NM) and fuel (lbs.) to climb from sea level to the given altitude. FliteStar can then calculate the climb between any two altitudes.

Navigate around the climb data window with the mouse, or by pressing TAB to advance to the next field and pressing SHIFT+TAB to return to the previous field. Enter the data as it appears in your Pilot's Operating Handbook (POH).
You can enter one or more climb profiles. If you enter more than one profile, you will choose a desired profile each time you plan a flight. To add a new profile:
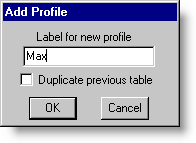
In the Climb Data dialog box, click Add New Profile. This opens the Add Profile dialog box.
Type a name that describes the climb table you are about to enter, such as Maximum Rate Climb, or Cruise Climb.
If another profile table already exists, select the Duplicate Previous Table check box to copy the table data to the new profile.
Click OK. The name will be added to the drop-down list that displays in the upper left corner of the window.

You must enter at least three altitudes for each weight and temperature combination you include. Otherwise you will get an INVALID AIRCRAFT DATA error message when you try to use this aircraft. If there is a weight and temperature combination for which you only have one published altitude, then consider omitting that entry.
If you enter only one weight, then FliteStar computes the same performance regardless of weight. If you enter only one temperature, then FliteStar computes the same performance regardless of temperature. To add a data into a table:
Enter a value in the Weight field. Use pounds or kilograms depending on what you used in the Aircraft Setup Information dialog box.
Enter an ISA temperature in the Temperature field. All temperatures are degrees Celsius relative to ISA. Use a plus or minus sign in front of the numbers to specify above or below ISA. The system assumes a positive number if you do not enter a sign.
Enter the Altitude. Save keystrokes by entering the altitude in thousands of feet. For example, if you type in "19", FliteStar interprets the entry as 19,000 feet.
Enter the Time in decimal minutes. For example, enter 4½ as 4.50 minutes.
Enter the Distance.
Enter Fuel in pounds or kilograms, depending on what you used in the Aircraft Setup Information dialog box.
Click Add Data to add the information to your profile.
Repeat this section to enter in a next entry for this profile. Again, you must enter at least three altitudes for each weight and temperature combination.
| NOTE | If you click Add Data prior to filling in the fields, you will enter a row of zeros. Follow the steps in Delete Data from a Profile Table (shown below) to delete such accidents. |
FliteStar sorts your entries by weight, temperature, and altitude. To minimize clutter, FliteStar does not display repeated values of weight and temperature.
To rename a profile:
Select the profile name in the profile drop-down menu.
Click Change Label.
Enter the new name in the Change Profile Label dialog box.
Click OK.
To delete data from a profile table:
Select the line of data in the table.
Click Delete Data.
To delete a profile table:
Select the profile name in the profile drop-down menu.
Click Delete Profile.
Click Yes to confirm the deletion.
NOTE |
If you delete a table or some data in error and have already confirmed, you can reverse your deletion by clicking Cancel when exiting the performance windows to cancel any changes you made. |
When you have entered the climb data information, save your edited fields or click Cancel to revert to the original data. If you are creating an aircraft model from scratch, click Next to continue to enter information for Cruise Data.