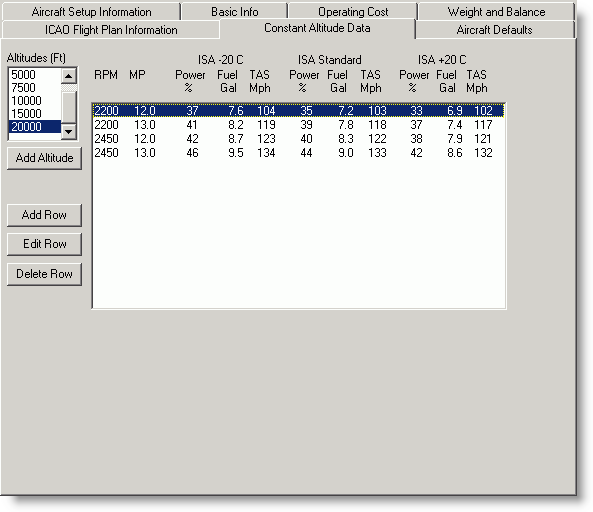
Many Pilot's Operating Handbooks provide information based on altitude. These aircraft can usually be added to the system as a Constant Altitude model without difficulty.
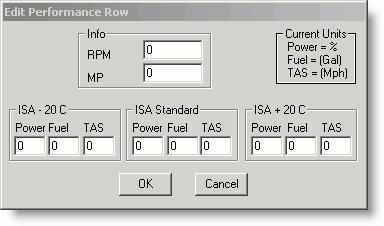
Navigate around the performance model window with the mouse, or by pressing TAB to advance to the next field and SHIFT+TAB to return to the previous field. Enter the data as it appears in your Pilot's Operating Handbook. The performance data must be filled in completely. Do not enter zeroes, leave any columns blank, or create two entries with the same RPM/MP.
| NOTE | If you selected Fixed Pitch under Setup Info/Aircraft Type, there is no entry for Manifold pressure (MP). |
For best results, add at least one altitude and corresponding performance table for each of the following:
A lower altitude.
One or more mid-range altitudes.
At least one altitude at or near the aircraft ceiling.
Make sure each altitude table contains at least three complete rows of RPM, MP (if applicable), Percent Power, Fuel, and True Airspeed (TAS) data for all three temperature ranges (ISA-20, ISA, ISA+20). The more complete the information, the more accurate the model can be, so entering more than the minimum data is suggested.
To add a new altitude:
In the Constant Altitude Data dialog box, click Add Altitude.
Enter the new Altitude.
Click OK.
The altitude will be added to the list (in proper numerical order) and a blank table appears. You need to add at least three rows of data following the procedures in Editing the Altitude Table.
To delete an altitude:
Select the entries you want to delete in the table, and click Delete Row.
When you exit the Performance screen, the system removes that altitude setting.
If you create an altitude setting and do not add any data, FliteStar will delete that power setting when you exit the performance screen.
To add or edit a row of data:
Open the Edit Performance Row dialog box using one of the following methods:
Click Add Row.
Select a row in the table, and then click Edit Row.
Double-click a row in the table.
Press the TAB key and SHIFT+TAB to move between the fields, or click in the field you wish to edit.
Enter your additions and changes.
Click OK to accept the data.
When you are satisfied with the performance data as it is entered in the table, save your work and close the window. If you wish to close the window without saving your work, click Cancel. If you are creating an aircraft model from scratch, click Next to continue to Aircraft Defaults.