To create a new aircraft, we strongly recommend modifying an existing sample model, even if it means changing every number. This is because editing an aircraft model similar to yours gives you a feel for how the data is entered for that type of aircraft. You also minimize the risk of saving and closing a model with empty or corrupt data fields, which will be difficult or even impossible to go back and fix.
If you do decide to create a new aircraft model, we strongly recommend that you set aside enough time to enter all the performance, weight & balance, aircraft default and other information in a single session, before closing the program or planning a route. If you come back and make changes, the program may require you to reenter performance or other information. This can waste hours of data entry time and possibly even corrupt the model data.
The Aircraft Model process will step you through the following information boxes to complete your aircraft model:
Performance Data
To begin building the aircraft model:
Click Edit > Default Aircraft.
In the Aircraft Library Manager dialog box, click File > Create a New Aircraft Model.

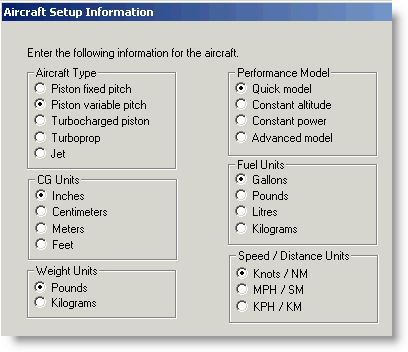
The Aircraft Setup Information dialog box displays.
Select your Aircraft Type. This is important because it determines what kind of performance charts you fill out and it determines the appropriate aircraft model dialog box to display according to the model type you choose. For example, if you select Piston fixed pitch as the aircraft type, you will not find any place to enter manifold pressure in the performance data. Jet aircraft models are only available in the Corporate version of FliteStar.
Set the units in which you will enter Center of Gravity (CG) values.
Select the units in which you will enter Weight values.
Select a Performance Model. Select the model type most appropriate to your aircraft and the data available to you. You can use the links below for additional information on each performance model:
| NOTE | Turbine aircraft can only be the Quick or Advanced Model. Jet aircraft should be entered using the Advanced Model. |
Set the Fuel Units. Use these fuel units everywhere in FliteStar, except in the weight and balance section, where you enter fuel in pounds regardless of units specified here. Keep in mind all reports mentioning fuel will use whatever units you enter here. If you enter fuel units in lbs. or kg., the corporate version allows you to display either lbs. or kg. in any report, regardless of the fuel units entered here.
Select Speed and Distance Units. FliteStar supports Miles per Hour (MPH), Knots (Kt), or Kilometers (Km). Your Pilot's Operating Handbook might use any of these units. Choose the unit type best suited to your data and enter it consistently throughout the program.
FliteStar displays distance in nautical miles. If you select units based on something other than nautical miles, you will have different units for speed and distance in your flight log. Winds aloft are also entered and displayed in knots regardless of units chosen here.
When you are satisfied with your changes, click Next to continue to the Basic Aircraft Data dialog box.