The Profile View allows you to view and change altitudes along your planned flight.
Minimum Enroute Altitudes (MEAs) appear in the Profile View as a heavy yellow line for routes planned with IFR flight rules and airway routing.
To display MEAs:
Right-click anywhere in the Profile View.
Choose Show MEAs from the shortcut menu by clicking on it to add a check mark next to the selection.
In the Profile View, you can select a different altitude for each segment of your trip. The number of route segments is based upon how many waypoints you set between your departure and destination airport. If you have only a departure and destination in your route, you have only one route segment. This situation primarily occurs on GPS/Direct routes. Use the rubberband feature to add waypoints along the route line.
To change the flight altitude of route segments:
Select one or more legs of the planned route by selecting a route segment in the Profile View. The selected route segment highlights in magenta.
Select more than one adjoining segment by pressing SHIFT and clicking the first and last segments. All of the intermediate segments are selected between the two segments that you clicked.
Select non-adjoining segments by pressing CTRL and clicking only the segments that you want to change.
Select all the segments by right-clicking an open area in the Profile View and choosing Select All Segments from the shortcut menu.


While holding down the mouse button, drag the segment to the desired altitude. The altitude selected displays in a tooltip on the left.
| NOTE | The Profile View is a good place to set Hard Altitudes. |
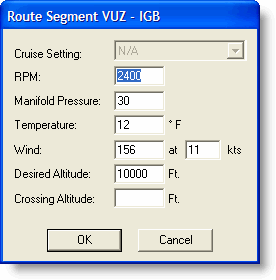
Use the Route Segment Properties dialog box to adjust Cruise Settings, RPM, Manifold Pressure, Temperature, Wind, Desired Altitude, and Crossing Altitude for the selected segments.
To display and adjust the information contained in the Route Segment Properties dialog box:
Select one or more route legs in the Profile View.
Right-click the selected route segments and choose Properties from the shortcut menu.
Manually enter the changes for the Cruise Settings, RPM, Manifold Pressure, Temperature, Wind, and Altitude.
Click OK to accept the changes.

See Also: