Use one of the following methods to access the various flight plans:
Click Preflight > Reports > Flight Plan (FAA Flight Plan, ICAO Flight Plan or ASA Flight Plan).
Click the Reports tab in the active view and click FAA Flight Plan, ICAO Flight Plan or ASA Flight Plan.
This opens a window containing a completed flight plan, including aircraft data from the aircraft model as well as route and aircraft performance information from the Navigation Log. You can resize the report in the view by using the options in the right-click menu.
View an image of the FAA Flight Plan
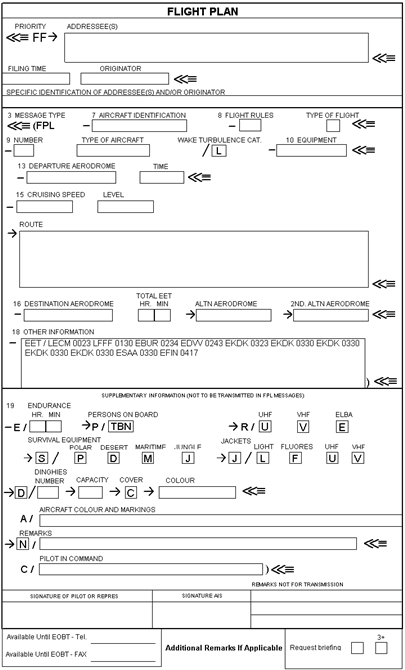
View an image of the ICAO Flight Plan
View an image of an ASA Flight Plan
The flight plan forms are editable. Every field on the reports can be changed and saved in the route file. When you change certain fields, a warning will display asking you to confirm your intentions, since most changes made in the flight plan are not reflected elsewhere.
If you manually edit a field in the Reports view, properties changes made in the Enroute Charts View are not necessarily automatically made in the flight plan. Therefore, if you modify the route properties in the Enroute Charts View, check your flight plan to confirm that the changes are reflected there.
If you need to: |
You will need to: |
Change the route type. |
Do one of the following:
|
Change the home base in the FAA Flight Plan. |
To change the home base for the aircraft used with the displayed RoutePack, right-click the RoutePack in the RoutePack List and select Properties. Next to the Aircraft drop-down menu, click Edit. Edit the home base in the Basic Info tab. This only changes the home base for the selected RoutePack. See Modifying and Adding an Aircraft Model in the RoutePack for more information. |
Change the aircraft used with the route. |
To change the aircraft used with the displayed RoutePack, right-click the RoutePack in the RoutePack List and select Properties. Select a new aircraft from the Aircraft drop-down menu. This only changes the aircraft for the selected RoutePack. See Modifying and Adding an Aircraft Model in the RoutePack for more information. |
Change the aircraft identifier for the current aircraft. |
To change the aircraft identifier used with the displayed RoutePack, right-click the RoutePack in the RoutePack List and select Properties. Next to the Aircraft drop-down menu, click Edit. Edit the aircraft identifier in the Basic Info tab. This only changes the aircraft identifier for the selected RoutePack. See Modifying and Adding an Aircraft Model in the RoutePack for more information. |
Change the true airspeed. |
To change the true airspeed used with the displayed RoutePack, right-click the RoutePack in the RoutePack List and select Properties. Next to the Aircraft drop-down menu, click Edit.
You can also click inside the text box and enter your desired true airspeed. This will not change any other parameters in the program. See Modifying and Adding an Aircraft Model in the RoutePack for more information. |
Change the departure time. |
Click inside the text box and enter the departure time. |
Annotate VFR in the Cruising Altitude Field |
If you fly VFR, but have to file an IFR-like flight plan to fly into, out of, or through an ADIZ, ensure the cruising altitude field uses the format VFR/altitude. 5000 feet is entered as 050, 11000 feet is entered as 110 (example: VFR/050, VFR/110). To change the format, click the Cruising Altitude text box, and manually enter the altitude using the VFR format. After the change is made in the FAA flight plan, it is carried forward in the appropriate text field when filing a flight plan with DUAT/S. |
Change the aircraft codes for the current aircraft. |
To change the aircraft codes used with the displayed RoutePack, right-click the RoutePack in the RoutePack List and select Properties. Next to the Aircraft drop-down menu, click Edit. On the Basic Info tab, click View/Edit and select or clear any of the aircraft code selection check boxes. This only changes the aircraft codes for the selected RoutePack. See Modifying and Adding an Aircraft Model in the RoutePack for more information. |
Change the amount of time for fuel on board. |
Edit the trip weight and balance by clicking Preflight > Weight & Balance for [Route]. See Weight and Balance Basic Information for more information. |
Change the number of people aboard. |
Use one of the following methods to change the number of people aboard:
See Modifying and Adding an Aircraft Model in the RoutePack for more information. |
Change the filed alternate airport. |
To change the primary alternate airport:
See Alternate Planning. |
The following describes how FliteStar determines the altitude and true airspeed (TAS) to be used in the FAA, ICAO and ASA reports. The algorithm might not pick the correct cruise leg one hundred percent of the time, but it should at least pick a cruise leg that shows up in the Navigation log.
The altitude and TAS at the prescribed altitude come from the planned route in the following order of precedence:
A non-procedure cruise leg.
The SID cruise leg with the highest altitude.
The STAR cruise leg with the highest altitude.
Finally, if the route contains no cruise legs, it uses the leg with the highest altitude.
In the ICAO flight plan, there is an exception to the departure time rule. If you delete the contents of the Departure Time field of the ICAO flight plan, the field remains blank so that you can fill in the departure time later when it is known. If you want the departure time displayed according to the route, simply use the Reset All Fields To Route option described below.
| NOTE | The FAA report calculates and displays a time, instead of remaining blank. |
The following elements determine the flight level display in the FAA and ICAO flight plan:
For the FAA report:
If the altitude is less than the flight-level cutoff (the default is 18000 feet), the altitude displays in standard numbers (for example, 23055 feet).
If the altitude is not a multiple of 100 feet, the altitude displays in standard numbers (for example, 23055 feet).
If the altitude is above 18000 feet and a multiple of 100 feet, the altitude is divided by 100 and prefixed with "FL" (for example, FL190).
For the ICAO and ASA report:
If the flight type is ZULU, the altitude is set to "VFR".
If the flight type is not ZULU and the altitude is less than the flight-level cutoff (the default is 18000 feet), it is divided by 100 and prefixed with "A" (for example, A120).
If the flight type is not ZULU and the altitude is not a multiple of 100 feet, it is divided by 100 and prefixed with "A" (for example, A195).
If the altitude is above 18000 feet and a multiple of 100 feet, the altitude is divided by 100 and prefixed with "F" (for example, F190).
| TIP | To change the flight-level cutoff, click Tools > Options. In the Routing tab, change the altitude in the Display altitude as flight level at or above field. |
After a field has been disconnected from the route, the connection can be restored by right-clicking on the field and selecting Reset Field To Route. All fields can be restored at once by right-clicking in the area around the report and selecting Reset All Fields To Route. Keep in mind that after the data is changed, it is saved with the route and will be displayed when the route file is loaded during the next session.
Certain fields do not give a warning if they are edited. Changing the Type of Flight, Departure Time or Number Aboard actually changes the properties of the route, so that data is never disconnected. The warning dialog is used only when there is a potential conflict between the route and the flight plan.
To print the flight plan, use one of the following printing options:
While viewing the flight plan, click File > Print > Print Report.
While viewing the flight plan, click the Print button in the Standard toolbar.
Click the Trip Kit button, and select FAA Flight Plan or ICAO Flight Plan under the Reports category. Click Print or Print Preview.