Click on the Preflight menu and choose RoutePack Wizard.
Click the RoutePack
Wizard button in the Quick Bar toolbar ![]() .
.
There are two ways to set up a route in FliteStar, the manual (or point and click) method and the RoutePack Wizard. If you have more than two or three waypoints it’s usually quicker to use the RoutePack Wizard to plan your flight. This is a fairly complex route generator that gives you a chance to use many different options.
Use one of the following options to open the RoutePack Wizard:
Click on the Preflight menu and choose RoutePack Wizard.
Click the RoutePack
Wizard button in the Quick Bar toolbar ![]() .
.
To set FliteStar to automatically show the RoutePack Wizard every time you launch the program, select the Show this Wizard at Startup check box at the bottom of the Pilot/Aircraft Selection dialog box in the RoutePack Wizard's first dialog box.
Use the TAB key to move between fields in the dialog boxes.
Select the following settings for this tutorial:
Aircraft: Beech Bonanza V35B
RPM: 2400 (default)
MP: 22 (default)
Override Cruise: (Leave Blank)
Select the Show this Wizard at Startup check box if you would like the Wizard to display when FliteStar launches.
Click Next to proceed.
The completed dialog box should look like this:

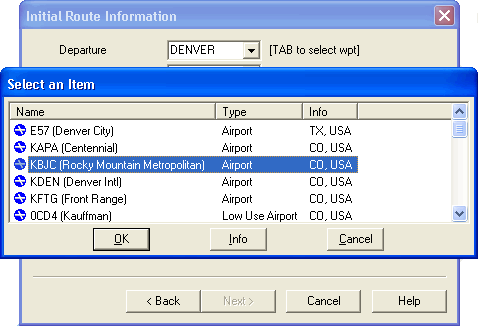
In the Departure box type Denver and press the TAB or ENTER key to begin a search.
Scroll down and select KBJC from the dialog box that appears.
Click OK.
In the Destination field type KPDX and press the TAB or ENTER key.
Type Jackson in the field to the right of the Fuel Stops/Must-Fly Points, above "No Waypoints", and press the TAB or ENTER key. Scroll down the selection list until the Jackson Hole Airport, KJAC, is highlighted.
Click OK.
Choose Land and Fill Tanks from the Stop Information dialog box that appears.
Click OK. Your stop is added to the Fuel Stops/Must Fly Points list on the left.
Type Bozeman in the field to the right of the Fuel Stops/Must Fly Points section and press TAB or ENTER. Scroll down the selection list until the Gallatin Airport, KBZN, is highlighted.
Click OK.
Choose Land Only from the Stop Information dialog box that appears.
Click OK. Your stop is added to the Fuel Stops/Must Fly Points list on the left.
Select the Optimize Stop Order check box to fly the shortest distance between these points, not necessarily in the order they were entered.
Select the Show Routing Progress and the Plan Alternate Landings check boxes. The completed dialog box should look like this:
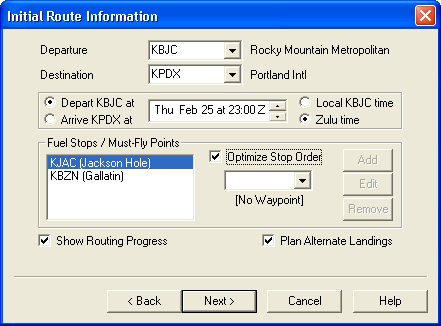
Click Next.
If you have the VFR version, use VFR settings for all legs.
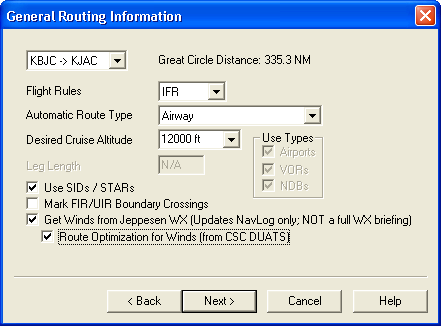
To enter general routing information:
Click the drop-down arrow next to All Legs. Select the first leg, KBJC -> KJAC, and set the following options:
Flight Rules: IFR
Route Type: Airway
Cruise Altitude: 12000 feet
select the Use SIDs/STARs check box.
select the Get Winds check box, then select Route Optimization for Winds (IFR and Corporate versions).
The completed dialog box should look like this:
Go back to the drop-down list at the top, select the next leg, KJAC -> KBZN, and then set the following parameters:
Flight Rules: VFR
Route Type: VOR/NDB/Airport
Cruise Altitude: 12500 feet
Leg Length: 100 NM
Select the check boxes for Use Types: Airports, VORs and NDBs
Clear the Use SIDS/STARs check box if it is checked.
Select the Get Winds and Route Optimization for Winds check boxes (IFR and Corporate versions).
Plan the last leg, KBZN -> KPDX, with the following options:
Flight Rules: IFR
Route Type: GPS/Direct
Cruise Altitude: 12000
Leg Length: 100 nm
Select the Get Winds and Route Optimization for Winds check boxes (IFR and Corporate versions).
| NOTE | If you are not online you will see an
error message that connection to the weather servers could
not be established.
Click OK to continue with the Wizard. |
When the parameters are set, click Next.
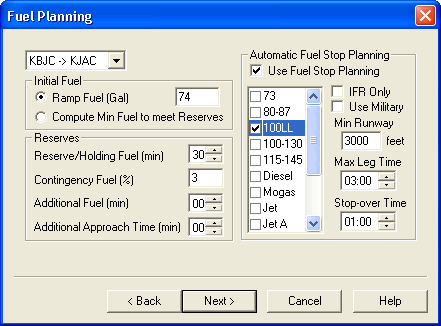
You have already added the fuel stop at KJAC, so these entries will not change the route. This is just so you can see the different options for fuel planning and stops.
Click the drop-down arrow next to All Legs. Select the first leg, KBJC -> KJAC, and set the following options in the fields:
Takeoff Fuel: 74 (default for this aircraft)
Reserve/Holding Fuel: 45
Contingency Fuel: 3%
Check the Automatic Fuel Planning check box and choose these options:
100LL
IFR Only
Minimum Runway Length: 3000 feet
Max Leg Time: 3:00 [hours]
Stop-over time: 1:00 [hour]
The completed dialog box should look like this:
Click Next.
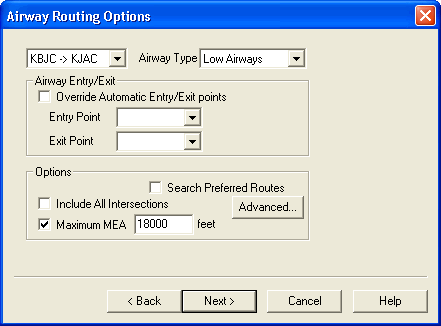
This dialog allows you to specify some parameters for airway routing. These will only apply to the route segment that you indicated should be planned on airways.
Remember: The KBJC -> KJAC route leg was designated as Route Type: Airways in the General Route Information dialog box, so only that leg appears in the drop-down box.
Set the parameters as follows:
Low Airways
Maximum MEA: 18000 feet
The program will default to the low or high enroute structure based on the altitude you previously set. You can set the low/high default altitude under Tools > Options > Routing.
The completed dialog box should look like this:
Click Next.
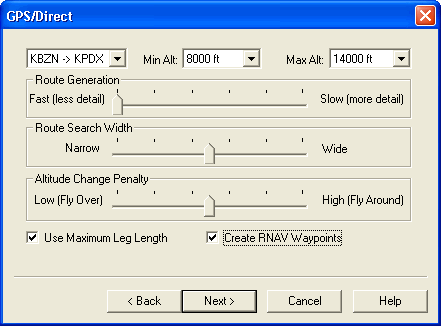
To specify the GPS or direct route attributes for the KBZN->KPDX leg:
At the top of the GPS/Direct dialog box, set the minimum altitude to 8000 feet and the maximum altitude to 14000 feet. This allows the router to search for a direct path between 8000’ and 14000’.
Set the Route Generation slider to the far left to speed up the search.
| NOTE | If the router displays a message that it cannot find a path for your intended flight, you can move the Route Generation slider to the far left, move the Search Width slider to the far right, or increase the maximum leg length, to broaden the options in finding waypoints. |
Select the Use Maximum Leg Length check box and the Create RNAV Waypoints check box to create waypoints every 100 NM.
| NOTE | Leaving the Max Leg Length check box clear will create a direct route with no intervening waypoints. Selecting the Create RNAV Waypoints check box generates waypoints along the route based on radial and distance from a VOR. |
The completed dialog box should look like this:
Click Next.
This is for airspace and terrain clearance that may apply to all legs, even though most airways take these into account. FIR/UIR route around options, which may affect how FliteStar routes along airways, are only shown when a route leg is selected.
Under Airspace, select the Danger, Prohibited, Restricted Areas check boxes.
Set the Terrain Clearance to 1000 feet. The completed dialog box should look like this:
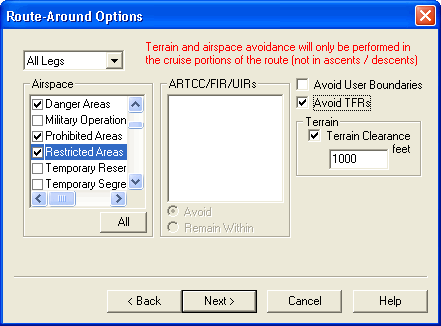
Click Next to proceed.
Since you selected SIDs at KBJC and STARs at KJAC in the General Routing Information dialog, the SIDs/STARs dialog box opens. To select a SID/STAR:
Select the Preview check box.
Click Use SIDs.
Click on some SIDs in the list (scroll down to view the entire list). The active Enroute Charts View changes to show you a preview of the routing for each SID you select. Choose the western departure, YELL0#.MBW.
The completed dialog box should look like this:
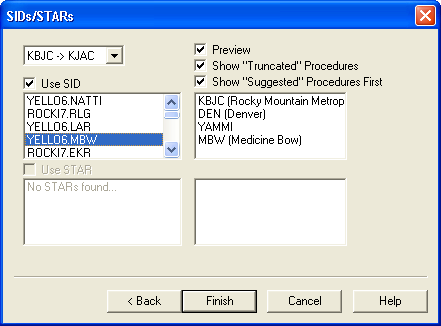
Since there are no STARs available for KJAC, click Finish to begin route calculation.
To plan an alternate route:
Accept the default values for the alternate parameters and click Next.
For the first leg, select None.
Select an alternate airport for the second and third legs.
Click Finish when done.
You can use the RoutePack Wizard to set other parameters for routes to alternates by saying Yes to the prompt for the RoutePack Wizard. Alternates are added to the RoutePack List, navigation log and flight plan, and can be modified the same as any other route.
To continue with the tutorial, click Working With The Route.