To further customize FliteStar, click Tools > Options.
The Display tab affects how enroute charts appear in JeppView.
Lat/Lon Display — Controls how latitudes and longitudes are displayed in the Status Bar. Select the type of display and enter the desired accuracy (maximum three decimal places).
Ruler Background Color — Determines the background color of the electronic ruler (see Electronic Ruler).
Display Grid MORA instead of MEA for airways — Select the Display Grid MORA instead of MEA for airways check box to display Grid MORA data under the Route column in the Nav Log. Clear the Display Grid MORA instead of MEA for airways check box to display MEA information where applicable. If MEA data is not available, the system uses Grid MORA data.
Display computed instead of published nav-aid radials — Calculates navaid radials in the Nav Log from current magnetic variation data rather than published numbers.
Hide Routes that are "Collapsed" in the RoutePack List — Hides routes in the enroute chart when the route tree is collapsed in the RoutePack List. This option makes it easier to work with multiple routes in the same RoutePack.
Enable ToolTips on Dialog Boxes — Displays ToolTips that provide a description of or helpful information about elements on dialog boxes. Clear the check box to disable ToolTips. Disabling ToolTips does not affect the pop-up messages for the toolbar buttons or within the enroute chart.
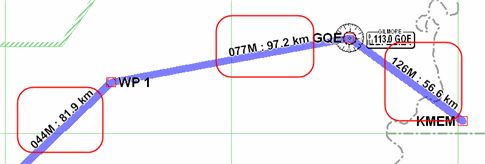
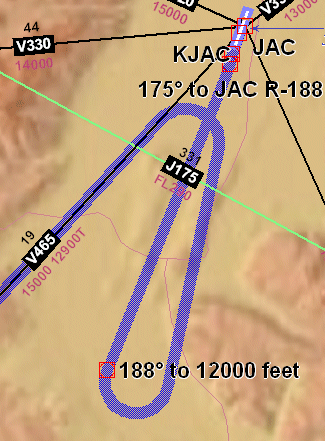
Display route leg information on chart — Displays magnetic course and distance for each leg of the routes that appear on the enroute chart (see image below).
| NOTE | Depending on the length of a route leg, the system might draw its label at a slight angle relative to the leg. |
Mouse wheel zoom — Sets your mouse wheel to zoom in and out rather than to scroll up and down.
Nav Log Display: Time — In the Nav Log, display time as hours:minutes:seconds, or just hours:minutes.
Nav Log Display: Fuel/Distance Precision — In the Nav Log, display distances to 0, 1, or 2 decimal places.
The Printing tab options affect how charts are printed from FliteStar.
Compass Rose — Prints a Jeppesen compass rose in the top right corner of the enroute chart, indicating true North.

Lat/Lon Grid — Displays latitude and longitude lines on the printed enroute charts.
Use Black Headers in Printout — Prints the headers on each printed page with white text on a black background.
| NOTE | When this option is cleared, the headers print as black text on a white background. This is useful for saving toner and keep thin papers from crinkling. |
Use “Compatible Mode” Printing — This is a backup option if FliteStar printing does not work properly with your printer. Every printer is different, and often printer drivers do not support every Windows option. If FliteStar print functions are suspended or terminated, the system selects this option automatically.
Use dash line to divide a page — Refers to the dash line representing the page center when printing two terminal charts per sheet. Some printer drivers move the line off-center, making it more difficult to judge the correct center line for cutting or folding.
Show Index page in RoutePack Printouts — Prints an index page when printing a RoutePack.
Allow large charts to be divided into smaller sizes — When selected, this option prints large European VFR Area charts over many pages. In order for FliteStar to print large VFR area charts appropriately, the Two per page check box must not be selected in the Printing RoutePack/Route dialog box. If the Allow large charts to be divided into smaller sizes check box is not selected, the large charts are scaled into a single page.
Use only Black/White in Report Printouts — Turns off the gray tones in all reports. This feature is useful when using a FAX machine to print reports.
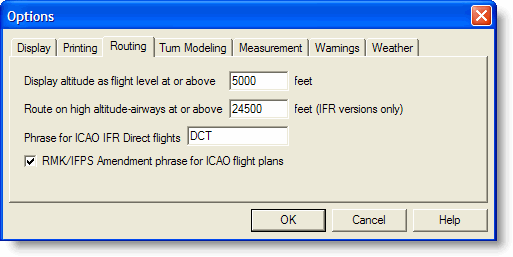
The Routing tab allows you to set the following routing information:
Display altitude as flight level at or above x feet in the flight plan forms.
Set the default altitude above which you want to the program to use high altitude airways.
Enter the word or phrase to use for "Direct" on the ICAO flight plan.
Append RMK/IFPS amendment phrase to field 18 of the ICAO flight plan. If selected, the phrase RMK / IFPS ROUTE AMENDED ACCEPTED appears.
Instead of showing turns as square corners, you can define the standard rate of turn and have them modeled in the route in the Enroute Charts View. Turn modeling also gives a better graphical description of course reversals.
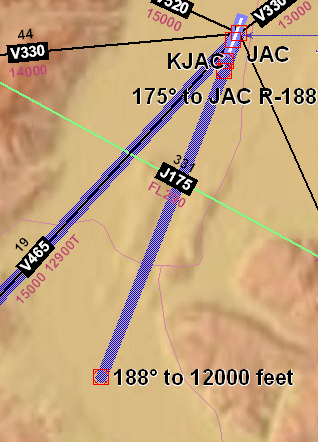
Turn Modeling Off Turn Modeling On
You can set the distance measurements used in FliteStar to show values in the unit type that you prefer.
The units assigned in this dialog do not change information related to the RoutePack or route, such as the Nav Log. If changes are needed that affect information in the RoutePack, see Basic Aircraft Data.
Examples of measurements affected in this dialog include the following:
Distance: Electronic Ruler, RoutePack Properties, Route Properties, Route Leg Information on Chart, Minimum Runway Length Filter, Obstacle Filters, Point and Click Routing, and Flight Info Bars (FliteMap)
Speed: Flight Info Bars (FliteMap)
Weight: Planned For Future Use
Fuel: Flight Info Bars (FliteMap)
Examples of measurements effected in this dialog include the following:
Temperature: Planned For Future Use
Pressure: Planned For Future Use
Reset All Program Warnings resets any warnings that have been deactivated, such as the warning that appears each time FliteStar is opened.
Change the METAR (Meteorological Aeronautical Report) minimums and color associations of METAR symbols displayed in the Enroute Chart view with the weather toolbar.
TAF text displays in the tooltip for the related METAR symbol on the chart, and in the Properties > Weather tab for the airport.
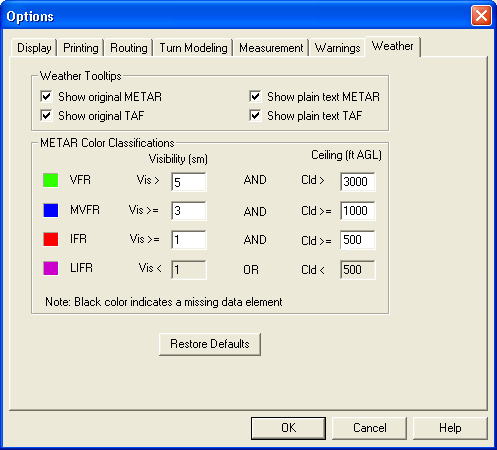
A METAR icon appears in the Enroute Charts view when information is available for an airport. Hover your mouse over the icon to view the text information in a tooltip. Use the Tools dialog to set the kind of information for the tooltip:
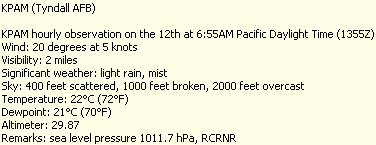
Show original METAR — Display the raw text data downloaded from the standard weather briefing.
Show plain text METAR — Display a plain text interpretation of the original METAR.
Show Original METAR |
|
Show Plain Text METAR |
|
Change the values in the Visibility or Cloud Ceiling column to match your personal minimums. Values can only be increased, that is, you cannot set a minimum below the FAA values, only more conservative values. Units are in SM (statute miles) and are not affected by selections in the Measurements tab.
The Cloud Ceiling column refers to the lowest cloud layer that has been defined as broken, overcast or obscured.
Click Restore Default to restore the METAR values to the original settings.
See also METAR Symbology.