Click Preflight > RoutePack Wizard
Click the RoutePack
Wizard button, ![]() ,
on the Quick Bar toolbar.
,
on the Quick Bar toolbar.
Since FliteStar routing options are extremely flexible, the program incorporates a RoutePack Wizard to make it easy to plan even the most complex routes. The RoutePack Wizard uses functionality common to most Windows programs. The RoutePack Wizard prompts you only for the information needed to plan the flight based on the parameters you set. For example, a short VFR flight will bring up fewer dialog boxes than a multi-leg airway route.
To run the Route Wizard multimedia Flash tutorial, go to the FliteStar Technical Support page at Jeppesen.com.
| NOTE | To have the RoutePack Wizard automatically appear each time you start FliteStar select the Show this Wizard at Startup check box. If you do not like this feature, simply clear the check box. |
Use of the following methods to start the RoutePack Wizard:
Click Preflight > RoutePack Wizard
Click the RoutePack
Wizard button, ![]() ,
on the Quick Bar toolbar.
,
on the Quick Bar toolbar.
The current pilot displayed is based on the selection you made when you opened FliteStar. For more information on pilot selection see Creating Your Pilot Profile.
Selecting your Aircraft — Click the arrow next to the aircraft field and select an aircraft type from the drop-down list as shown below. For more information on choosing and modifying an aircraft see Selecting an Aircraft Model. The default aircraft is automatically selected for you, but you can choose any of the available aircraft in the list.
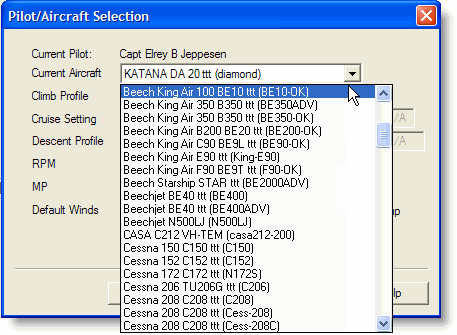
Performance Settings — After you select your aircraft, FliteStar displays some basic performance default values. Some windows are grayed out, depending on the type of aircraft model used. You may change the other performance settings manually. For aircraft that use manifold pressure and/or RPM, edit the field directly.
| NOTE | Change the aircraft default settings by clicking Edit > Default Aircraft. In the Aircraft Library Manager, select the aircraft and click Edit. Make the changes in the Aircraft Defaults tab. |

Override Cruise — For aircraft models that display cruise settings, select the Override Cruise check box to enter the values you would like FliteStar to use for the Route you are about to plan.
Default Winds — You may also set default winds in this window of the RoutePack Wizard. Enter speed and direction in the appropriate fields. These values are applied throughout the route. This is of value for what-if calculations in the Navigation Log and Route Calculator while offline.
Skip This Page — If you fly the same aircraft most of the time, you can select the Skip This Page check box. The next time the RoutePack Wizard opens, it will open on the second page. Use the Back button to get back to the aircraft selection page later.
Show this Wizard at Startup — To have the RoutePack Wizard automatically appear each time you start FliteStar, select the Show this Wizard at Startup check box. If you do not like this feature, clear the check box.
Click Next when you are finished modifying this dialog box.
Use the Initial Route Information dialog box to set your departure, destination, departure time, and any intervening stops or must-fly waypoints.
Entering Departure and Destination Points — Click on the Departure and Destination fields, and enter the ICAO 4-letter identifier, the IATA code, a city name, or airport name. If the name you entered corresponds to multiple possible waypoints, press TAB or ENTER. FliteStar displays a selection dialog box from which you can choose your desired departure point. Click OK to accept or Info to view additional information about your selection.
For recently used departure and destination points, use the drop-down menu right of the Departure and Destination fields.
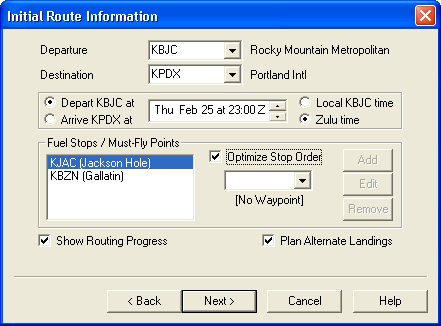
Departure Time — Set your departure time by time of departure or time of arrival. FliteStar works back from your desired arrival time to show the necessary departure time in the flight plan. The departure time field contains a day, date, and time. Edit the information by clicking on the up/down arrows to the right side of the window. The arrows adjust the values of whatever is highlighted in the window. You can also enter new numbers for the date and time.
Local time or Zulu time — Use your mouse or keyboard arrow keys to move the highlight within the window. Once complete, use the check box to select Local time or Zulu time for the display in the Navigation Log, flight plans and weather downloads. Your current computer time zone setting determines the GMT time used.
Fuel Stops/Must Fly Points — To plan stops or fly-over points along your route, enter the waypoint using the same method as the departure/destination selection described above. Skip this feature to use the automatic Fuel Planning or Plain Language routing features.
To enter fly-over points or stops along your route:
Enter the waypoint identifier or name in the field to the right of the Fuel Stops/Must Fly Points section.
If your entry references multiple waypoints, press TAB or ENTER to bring up the selection dialog box and select the desired stop.
Click Add to place the waypoint in the list.
Select one of the Land and Fuel options from the Stop Information dialog box. Add any additional time you plan to spend at this stop.
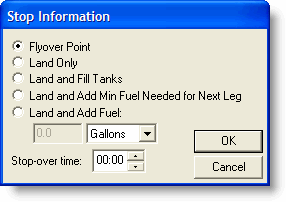
Click OK to accept.
Continue to enter Fuel Stops/Must fly points until you are done.
Optimizing Order — After you enter a second stop/flyover point, you can optimize the stop order. If you want FliteStar to plan your flight using the most efficient route possible between your stops, select the Optimize Stop Order check box.
Editing or Deleting Fuel Stops/Must Fly Points — To modify or delete fuel stops/must fly points, highlight the stop in the list and click Edit to open the Stop Information dialog box, or click Remove to delete the waypoint from your route.
Showing Routing Progress — Select the Show Routing Progress check box to see a graphic representation of FliteStar’s route searching. This is a good way to see at what point any problems may arise in the route calculation.
Planning Alternate Landings — Select the Plan Alternate Landing check box to be presented with a dialog box at the end of the route planning process to select alternate landing points.
Click Next when you are finished modifying this dialog box.
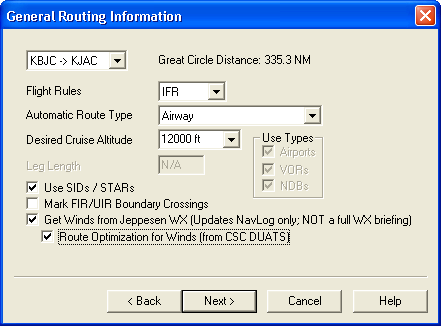
Route Legs — FliteStar allows you to specify different routing types for each leg of your flight. By default, FliteStar assumes you want to apply your routing preferences to All Legs, as indicated in the field at the top left of the window. The is shown to the right of the route leg drop-down box.
If your route changes direction so as to require an altitude change, the Desired Cruise Altitude field will be blank. Click the drop-down arrow next to All Legs, then click each leg to specify correct altitudes.
To specify different route types for different legs, click the drop-down arrow at the top left and select a leg. Specify the parameters for each leg before selecting another.
To select routing options:
Select a Route leg or All Legs as described above.
Select the Flight Rules to follow for your route or route leg. FliteStar includes flight plan types for FAA and JAR regulations, and adjusts the planned altitude based on the flight rules:
IFR — FliteStar applies IFR cruising altitudes to your flight. The hemispheric rules state that when operating below 18,000 feet MSL on a magnetic course of zero through 179° , you must fly an odd thousand foot MSL altitude, and for courses of 180° through 359° , an even thousand foot altitude must be maintained. You might need to adjust the altitudes in controlled airspace that do not comply with east/west rules. If your aircraft is RVSM compliant, additional flight levels will be made available to you between FL290 and FL410 (see Reduced Vertical Separation Minimum (RVSM).
VFR — FliteStar applied VFR cruising altitude to your flight. If you are flying a magnetic course of zero through 179° , fly an odd thousand foot MSL altitude plus 500 feet. If you are flying a magnetic course of 180° through 359° , fly even-thousand foot altitudes plus 500 feet.
DVFR — Altitude rules are the same as VFR flight rules.
VFR Night — Altitude rules are the same as VFR flight rules.
Yankee — Used for composite flight plans where flight is IFR for the first portion of a flight and VFR for the second portion.
Zulu — Used for composite flight plans where flight is VFR for the first portion of a flight and IFR for the second portion.
Select the route type for your route or route leg. See Route Types for an explanation of each option.
GPS/Direct
Airway
VOR/NDB/Airport
Plain language
| NOTE | When planning trans-Atlantic flights, use the GPS/Direct or plain language route type. |
Select a preferred Cruise Altitude for the route or leg. The default altitude is based on the default for the aircraft you have selected. (To change this value, go to Edit > Default Aircraft > Edit).
When you enter a multi-leg route and select All Legs, the Cruise Altitude field becomes blank. Select a leg and FliteStar displays correct altitudes in the drop-down box for the route type and direction you are flying. You may also enter an altitude manually.
Adding a fuel stop or must-fly point removes the Plain Language route type option.
Enter a Maximum Leg Length (NM) if applicable. GPS/Direct and VOR/NDB/Airport routing both allow you to specify a desired maximum leg length between waypoints. FliteStar will then limit its search to potential paths that do not exceed your specified length. If after attempting to find a route, the program tells you it cannot find a path, try increasing the maximum leg length.
To use a pilot-nav Standard Instrument Departure (SID) and an arrival procedure, select the Use SIDs and STARs check box. You will specify procedures in a dialog box after selecting your Routing Options. If, after attempting to find a route, the program tells you it can not find a path, try changing either or both procedures; sometimes the selected entry/exit points conflict with each other or the airways.
Select the Mark FIR/UIR Boundary Crossings check box to have the Enroute Charts View display all the FIR/UIR intersections as a route waypoint.
IFR and Corporate versions - To apply live weather or DUAT/S forecast winds to your route plan, select the Get Winds and Optimize for Winds check boxes. For long routes, this often results in routes that are longer in distance than the optimal distance used without this option, but less expensive in terms of time or fuel. The weather provider selected in the Weather > Setup dialog is used for route optimization.
· For Airway and Airport-VOR-NDB Routes, the route optimization is only two dimensional. FliteStar searches along the cruise altitude specified in the General Routing Information dialog box of the Route Wizard.
· The GPS/Direct auto-router optimizes in three dimensions. It searches for the best altitude at the same time it considers the best horizontal geometry of the route.
| NOTE | Only Internet access to DUATs providers is supported in the wind-aware download. Dial-up access is not supported. |
Repeat the instructions (1-7) for each route leg unless you selected the default, All Legs.
Click Next when you are finished modifying this dialog box.
Beyond this point, the dialog boxes you see in the Wizard vary depending on which routing options you chose:
Plain Language Routing — Appears for Plain Language Routing Only.
Fuel Planning — Appears for all route types except Plain Language routing.
Airway Routing Options — Appears if you selected to route through the Low or High airway systems.
GPS Direct — Appears if you selected GPS/Direct Routing.
Route-Around Options — Appears for all route types except Plain Language routing.
Departures and Arrivals (SIDs and STARs) — Appears if you selected the Use SIDs/STARs check box earlier.
Fuel Planning allows planning for individual legs or an entire route. The Ramp Fuel value, toward the top left side of the dialog box, is taken from your aircraft model data. You will set load amounts for this flight in the Weight and Balance dialog box after finishing the RoutePack Wizard. See the Aircraft Defaults in the aircraft model to change the default fuel capacity.
Enter whatever reserve and contingency values you are comfortable with for this flight. The Additional Fuel and Approach Time fields are designed primarily for ICAO users.
FliteStar will use these values in the route calculation, whether you choose the Automatic Fuel Planning feature or not.
Select the Automatic Fuel Stop Planning check box to have FliteStar find optimal fuel stops along the route. The requirements you set on this side of the dialog box limits FliteStar’s selection to only those airports suitable to your aircraft. You also have options to set a maximum amount of time between stops and how much time you expect to remain on the ground at fuel stops.
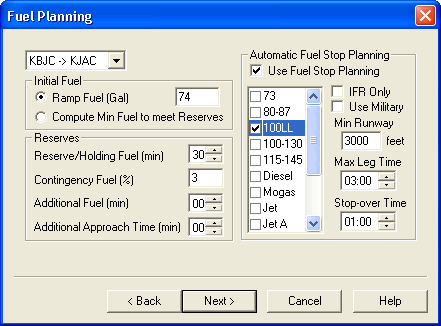
Click Next when you are finished modifying this dialog box.
In this window you choose the Low or High airway system and indicate specific airway entry and exit points you would like to use. If you leave these fields blank, FliteStar will select the most efficient way to enter and exit the airway structure.
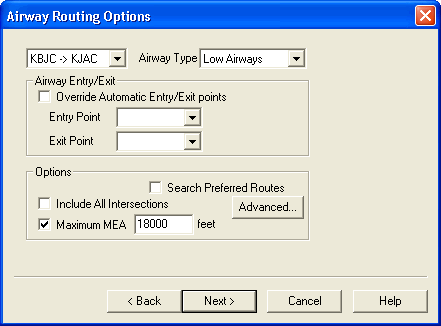
To search for Automatic Entry/Exit points, select the Override Automatic Entry/Exit points check box, and then search for alternatives the same way you searched for waypoints in the Initial Route Information dialog box.
Use the Advanced button to control how far the router will jump from the procedure’s end or beginning point to the airway system by setting either distance or cost limits.
Other options include using preferred routes (if available), include all intersections (which adds all intersections to your RoutePack List, Navigation Log and GPS/FMS upload), and a place to set maximum MEA. The maximum MEA option tells FliteStar to plan your flight on airways that have an MEA at or below the altitude you specify. This can be particularly useful in mountainous areas where you are flying an non-pressurized aircraft and want to avoid using oxygen.
FliteStar contains a database of preferred routes. Select the Search Preferred Routes check box in the Airway Routing Options dialog box, and you will be presented with a list of the preferred routes available with their associated waypoints. If you would like to see what each preferred route looks like before committing to it, select the Preview check box. A depiction of the route is presented in the active Enroute Charts View.
Selecting a preferred route will add it, and all the associated fixes, to your flight plan. In the U.S., preferred routes are available for low and high altitude airway routing.
GPS/Direct routing takes you directly from the departure to the destination without deviation, unless you specify terrain or airspace avoidance.
The two altitude drop-down fields allow you to set Minimum and Maximum Altitudes to avoid terrain or airspace in your path. Leave these altitudes the same if you only want the router to plan lateral avoidance.
There are three slider bars for further adjusting how the route is created.
Set the Route Generation slider to the far left to reduce the time it takes to find a route. Setting the slider toward the right will take longer to generate a route, but the program will not cut any corners to save time.
The middle slider, Route Search Width, determines the maximum distance from the direct path you are willing to deviate. The terms "narrow" and "wide" are not set distances. They are proportional to the length of your route – the longer the route, the more distance is built into the settings.
The Altitude Change Penalty slider lets you weight the router toward either going up over or going around any obstacles.
If the router displays a message that it cannot find a path for your intended flight, you can broaden the options:
Move the Route Generation slider to the left,
Move the Search Width slider to the right,
Increase the maximum leg length.
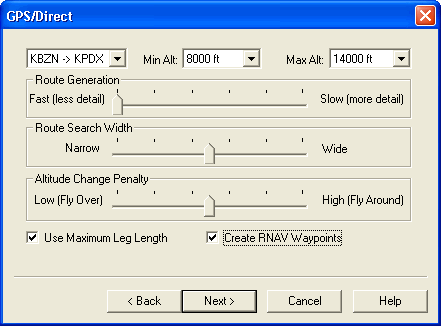
Select the Use Maximum Leg Length check box and the Create RNAV Waypoints check box to create radial navigation waypoints every so many miles along your route. The leg length is determined from the entry in the General Routing Information dialog box earlier in the RoutePack Wizard. Clearing the Max Leg Length check box creates a direct route with no intervening waypoints.
Selecting the Create RNAV Waypoints check box generates waypoints along the route based on radial and distance from a VOR, at the interval you specified as the max leg length in the General Routing Information dialog box.
Click Next when you are finished modifying this dialog box.
For all route types except Plain Language, FliteStar asks you to select the classes of airspace you would like to avoid. You may select none, any, or all of the airspace classes to route around. To select all classes at once, click All (located at the bottom of the list). Versions 8.5 and up include Class D and E airspace in All. If FliteStar cannot find a path for your proposed route, try clearing some check boxes from some of the airspace classes.
You may also elect to avoid (or remain within) certain FIR/UIR and avoid user-defined boundaries. FliteStar ignores these boundaries during its routing calculations if none are selected.
To route around TFRs, select the Avoid TFRs check box. The router avoids all TFRs except those for speed restriction.
Check the Terrain Clearance box and specify a minimum altitude for terrain clearance if desired.
| WARNING | Remember, FliteStar’s terrain information should only be used as a guide and cannot be relied on as a guarantee of terrain avoidance. |
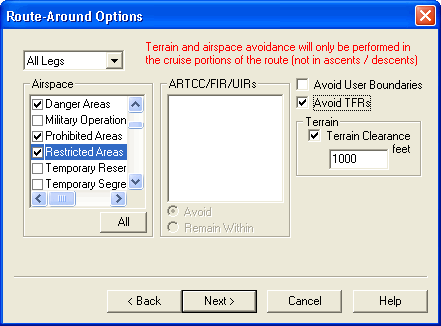
Click Next or Finish to continue.
FliteStar contains a database of all published Standard Instrument Departures and Standard Terminal Arrivals (this does not include vectored procedures). If you selected the Use SIDs/STARs check box earlier in the General Routing Information dialog box, the SIDs/STARs dialog box appears after the Route_Around Options dialog. To select SIDs or STARs for each leg of a multi-leg route, use the drop-down box in the top left.
The dialog box includes lists of SID/STAR identifiers and their associated fixes by airport, the departure on top and the arrival below. View the SIDs/STARs available for an airport by selecting the Use SIDs or Use STARs check boxes.
To preview a SID or STAR in the Enroute Charts View, select Preview and highlight the procedure.
Click Show "Truncated" Procedures to select from partial SIDs or STARs. FliteStar plans your route before reaching the end of a SID transition. On a STAR, FliteStar picks up the procedure somewhere after the initial transition fix. This allows more expedient routing, especially on GPS direct routes.
If this checkbox is available, we recommend selecting it and leaving it selected. If you go into a completed route and edit the SIDs/STARs, the truncated procedures will be shown and there will be no switch to turn them off like there is here.
Click Show "Suggested" Procedures First to sort the procedures in order from your route direction.
| NOTE | When selecting a procedure, verify with your paper or electronic terminal charts that the procedure is still valid and has not been replaced or modified. Navigational data is updated every 28 days and changes within the associated 28 days may not occur until the next navdata update cycle. |
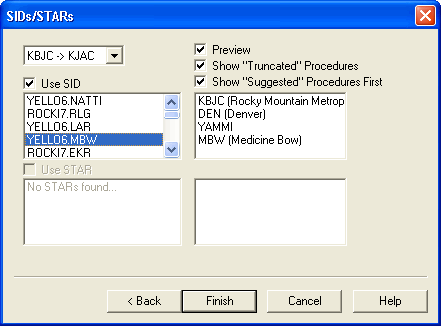
Click Finish to add the SID or STAR and its associated fixes to your Route, Flight Plan, and Navigation Log.
See also: